Starting Small – Why a Custom Terrarium Matters
When you first think about setting up a home for a turtle, it can feel a bit overwhelming, right? There’s so much to consider: tank size, water depth, basking spots, lighting, substrate, plants, decorations, and on top of that, your budget. But here’s the thing—turtles are surprisingly adaptable little critters, and with a bit of thought, you can create a safe, stimulating, and downright beautiful terrarium without spending a fortune. And that’s where the magic of building a custom turtle terrarium comes in.
Custom terrariums are more than just a place to toss your turtle and call it a day. They’re about shaping an environment that mirrors, as closely as possible, the turtle’s natural habitat. Take a red-eared slider, for example. These turtles thrive in a mix of water for swimming and a basking area for soaking up heat. Or consider a Russian tortoise, who’s mostly terrestrial and loves digging and hiding under rocks. Each species has unique needs, and by building a custom setup, you can accommodate those needs without feeling like you’re buying a pre-made box that doesn’t quite fit.
Table of Contents
Now, before you start imagining high-end aquariums with fancy LED lighting and automatic filters that cost more than a small vacation, breathe. You don’t need all of that. In fact, some of the most effective setups I’ve seen are the simplest. One of my favorite memories is visiting a friend’s home with a mid-sized tank for his painted turtle. He’d used some old slate rocks for basking platforms, a shallow dish for water, and a few hardy plants like anubias and java fern. The turtle was happier than any slider I’d ever seen in a showroom tank—and the total cost was less than $50.
What’s essential here is thinking like a turtle. Ask yourself: what would make this space feel natural? Where would I swim, hide, or sunbathe? Then work backward: what materials do I already have at home, and what can I source cheaply? A little creativity goes a long way. For instance, scrap wood can be turned into sturdy platforms, old plastic containers can double as planters or shallow water dishes, and smooth river rocks from a garden center can make a perfect basking area.
Budget isn’t just about cutting costs—it’s about prioritizing what really matters for your turtle’s well-being. Water quality, temperature, and lighting are non-negotiable. But decorative extras? Those can be DIY projects or even repurposed household items. And here’s the bonus: building your terrarium yourself creates a sense of ownership. You’ll find yourself tweaking the layout, testing new enrichment ideas, and watching your turtle explore in a space you literally crafted with your own hands. That kind of engagement is hard to buy.
Another thing to remember is that turtles, unlike fish, are surprisingly interactive. They notice changes in their environment, and they often respond to thoughtful design. A well-placed basking rock near a light can encourage them to stretch and absorb UVB rays. A simple floating platform in the water can provide a quiet resting spot. Even inexpensive live or fake plants can offer shade and cover, giving your turtle that sense of safety. Every little touch counts—and none of it needs to drain your wallet.
So why start small? Because overcomplicating things too soon can be a recipe for frustration. Focus on the basics first: clean water, proper temperature gradients, safe surfaces, and enough room to swim and bask. Once those are nailed down, you can add in the fun, creative touches—plants, hiding spots, enrichment items, decorative rocks. And the cool part? You’ll likely come up with ideas that feel more personal and imaginative than anything you could buy pre-made.
At the end of the day, building a custom turtle terrarium on a budget isn’t just about frugality. It’s about connection. You’re learning your turtle’s quirks, preferences, and behavior. You’re shaping a space where it can swim, bask, dig, and explore safely. And, honestly, it’s pretty satisfying to watch a creature you care about thrive in an environment you literally crafted with thought and hands-on effort.
So, take a deep breath, get a notebook, and start planning. Think small, think smart, and think like a turtle. Because the more you understand their world, the better your custom terrarium will be—and trust me, your turtle will notice every bit of that love and care.
Planning Your Turtle’s Dream Home
Building a turtle terrarium isn’t just slapping a tank on a table and calling it a day. Planning is where the magic happens—you get to balance your turtle’s needs, your space, and your budget all in one. Let’s break it down, step by step, so that even on a tight budget, you can create a space that feels natural, safe, and downright inviting for your shelled friend.
Choosing the Right Size and Shape
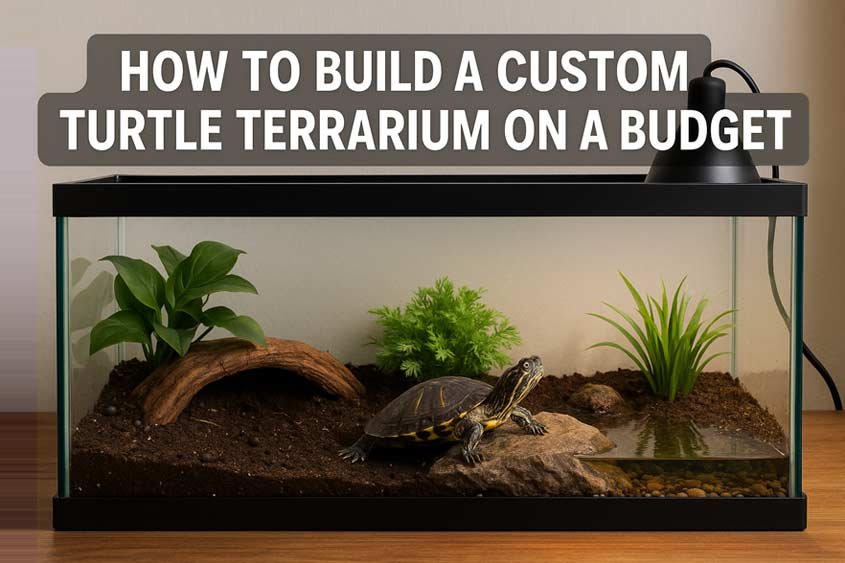
Tank size is one of the most common stumbling blocks for first-time turtle keepers. People often underestimate how much space a turtle really needs. A tiny tank might seem like a budget-friendly choice, but it can stress your turtle, stunt growth, and create a maintenance nightmare. For example, a single red-eared slider really thrives in at least a 40-gallon tank, while smaller species like a musk turtle might do well in 20–30 gallons.
When thinking about shape, don’t just focus on height. Turtles love to explore horizontally, so long tanks are often better than tall ones. A good rule of thumb: the tank should be at least four times as long as your turtle’s shell and twice as wide. This gives them room to swim, turn, and explore without bumping into walls.
Selecting Materials That Won’t Break the Bank
You don’t need fancy acrylic or high-end glass to build a safe terrarium. Standard aquarium glass works perfectly, and if you’re handy, you can even repurpose old aquariums. Think about sealing edges with non-toxic silicone—this keeps leaks at bay without costing much.
For the land portion, lightweight foam boards or scrap wood can be shaped into platforms and ramps. Cover these with safe, textured materials like coconut fiber or slate to prevent slipping. For water, shallow plastic containers or DIY partitions can create swimming areas without expensive custom tanks.
Lighting, Heating, and Water Requirements
Lighting isn’t optional—your turtle needs UVB to metabolize calcium and stay healthy. You don’t need a high-end fixture; a standard UVB bulb paired with a simple basking lamp is sufficient. Position it above a basking spot so your turtle can move in and out of the heat as it pleases.
Water temperature matters, too. A small submersible heater can keep tropical species like the yellow-bellied slider comfortable, while temperate species may do fine without one. Depth depends on the species: aquatic turtles need enough water to swim freely, but shallow areas near the basking platform are essential to prevent fatigue.
Essential Equipment vs. Optional Extras
- Essential:
- UVB lighting
- Heat lamp
- Tank of appropriate size
- Safe substrate for land and water areas
- Water filtration or regular water changes
- Optional:
- Decorative plants (real or fake)
- Floating basking platforms
- Driftwood or rocks for climbing
- Thermometers or timers
Common Mistakes to Avoid
Even experienced keepers sometimes fall into traps that are easy to miss. Avoid these common missteps:
- Overcrowding: More turtles than the tank can handle leads to stress and aggression.
- Insufficient basking space: Every turtle needs a dry, warm area to rest and metabolize nutrients.
- Ignoring water quality: Dirty water is a leading cause of shell rot and infections.
- Cheap, unsafe decorations: Sharp edges, toxic paints, or unstable structures can injure turtles.
Quick Planning Checklist
- Measure your space and select an appropriately sized tank
- Decide on the water-to-land ratio based on species
- Source affordable materials for land and platforms
- Plan lighting and heating layout
- Map out filtration or water change routines
By taking the time to plan properly, you’ll save money in the long run. A thoughtfully designed terrarium reduces stress, prevents disease, and makes maintenance easier. Plus, you’ll have a turtle setup that looks good and functions even better—without emptying your wallet.
DIY Substrate, Land, and Water Areas
Creating a comfortable and functional terrarium for your turtle doesn’t have to break the bank. In fact, some of the best setups I’ve seen were made entirely from affordable, repurposed, or DIY materials. This is where creativity meets practicality. Let’s dive into how to craft substrate, land, and water areas that are safe, stimulating, and wallet-friendly.
Creating a Safe, Affordable Substrate
The substrate is literally the ground your turtle walks on, so it has to be safe, easy to clean, and comfortable. For aquatic turtles like red-eared sliders or painted turtles, gravel can be tricky—small stones may be accidentally swallowed. Instead, consider:
- Large river rocks or pebbles: Cheap, easy to clean, and impossible to swallow.
- Sand mixed with organic soil: Provides a natural look, especially for species like musk turtles or box turtles.
- Coconut fiber mats or eco-friendly liners: Perfect for the land portion, retains moisture, and is soft on turtle feet.
For budget purposes, you can repurpose items around the house. A shallow tray lined with sand or soil can double as a digging spot, and old aquarium substrate can be cleaned and reused if safe. The key is avoiding anything sharp or chemically treated.
Designing the Perfect Land-to-Water Ratio
Turtles are split into aquatic, semi-aquatic, and mostly terrestrial species, and your terrarium should reflect that. Red-eared sliders need about 60% water to 40% land, while a Russian tortoise prefers mostly land with a shallow water dish.
Tips for balancing land and water without spending a fortune:
- Use old plastic containers, cut and stacked, to form a raised land area. Cover with rocks or soil.
- Sloped ramps made from untreated wood or slate allow turtles to climb safely from water to basking spots.
- Floating platforms, like DIY cork or foam rafts, give turtles extra basking and resting space in the water.
Pay attention to stability. A wobbly ramp or platform can injure your turtle and create unnecessary stress. A little sanding, extra silicone, or small weights can make DIY land areas solid and secure.
Affordable Decorative Elements
Decor doesn’t just make your terrarium look good—it provides enrichment, hiding spaces, and climbing opportunities. The trick is using inexpensive or repurposed items:
- Driftwood or small branches: Great for climbing and hiding. Pick pieces that are smooth and chemical-free.
- Rocks and slate: Stack carefully to make caves or basking areas. Avoid sharp edges.
- Plants: Hardy live plants like anubias, java fern, or pothos tolerate occasional nibbling. Fake plants are also budget-friendly and easy to clean.
Budget-Friendly Materials List:
- Sand, coconut fiber, or soil
- River rocks or pebbles
- Driftwood or untreated branches
- Small plastic trays or containers for raised land areas
- Foam or cork for floating platforms
Materials for Basking Platforms:
- Slate or flat stones
- Wooden ramps coated with safe sealant
- Recycled plastic trays with a rough texture
The goal is a mix of surfaces and elevations that mimic a turtle’s natural habitat. Every hill, shallow pool, and hiding spot encourages natural behavior and keeps your turtle engaged.
When done thoughtfully, DIY substrate, land, and water areas provide both function and flair, all without emptying your wallet. The key is safety first—smooth edges, non-toxic materials, and proper water-to-land ratios—combined with creativity to make the terrarium feel alive. Even a simple setup with a few rocks, a small ramp, and a sand patch can become a dynamic, stimulating environment.
Budget-Friendly Enrichment and Decor
A turtle terrarium isn’t just about water, land, and a basking spot. It’s about creating a space that encourages natural behaviors like exploring, hiding, climbing, and foraging. Enrichment doesn’t have to be expensive—sometimes the cheapest ideas are the most effective. With a little creativity, you can make your terrarium an engaging playground for your shelled friend.
Encouraging Natural Behavior Without Overspending
Turtles, whether it’s a painted turtle swimming in a mid-sized tank or a box turtle exploring a semi-aquatic setup, need stimulation. Without it, they can become bored or stressed. Simple ways to encourage natural behavior include:
- Rearranging rocks and platforms periodically to create “new” spaces.
- Adding shallow water trays or small pools to encourage swimming or wading.
- Placing hiding spots in different areas so your turtle can choose where to feel safe.
Even inexpensive items like PVC pipes, clay pots, or cardboard tubes can mimic burrows or tunnels. A simple log or rock stack can provide climbing challenges without costing a dime if you repurpose materials.
Making Your Own Hiding Spots and Climbing Areas
Turtles love security and a sense of control over their environment. Creating hiding spaces doesn’t require expensive caves or manufactured decorations.
- Clay pots or broken planters: Turn upside down and create a little cave.
- Stacked slate or rocks: Form small caves for turtles to crawl under or around.
- DIY ramps and bridges: Use scrap wood or foam pieces to make gentle slopes for climbing.
These features not only enrich your turtle’s life but also help replicate the natural variations found in rivers, ponds, or forest floors. Your turtle will appreciate the variety—sometimes they bask, sometimes they hide, and sometimes they just wander curiously around a new obstacle.
Cheap materials for DIY turtle toys
- PVC pipes or tubing
- Small terra cotta pots
- Smooth stones or slate
- Cork bark pieces
- Foam or cork platforms
Ways to mimic natural habitats on a budget
- Rearrange rocks and ramps regularly
- Add floating platforms for exploration
- Include both shaded and sunny areas
- Provide multiple shallow water spots for wading
Enrichment isn’t just decoration—it’s mental stimulation. Watching a turtle figure out how to climb a ramp, hide under a log, or investigate a new plant is fascinating. And the great thing is that these setups can be updated and changed easily. A turtle’s curiosity is constant, and your creativity keeps the terrarium dynamic without spending much money.
Even a budget-friendly setup can become a lively, naturalistic environment if you pay attention to the turtle’s preferences and keep switching things up. Think like your turtle: what would make this space feel interesting, safe, and fun? With simple DIY materials and some imagination, your terrarium can be as enriching as a high-end setup—without the high-end price tag.
Maintenance and Health on a Budget
Keeping a turtle terrarium running smoothly doesn’t have to drain your wallet. In fact, with a little planning, you can maintain clean water, a healthy environment, and a well-fed turtle using simple, affordable methods. Budget-friendly maintenance is all about smart routines, clever hacks, and knowing what truly matters for your turtle’s health.
Easy Cleaning Routines That Save Money
Water quality is critical. Dirty water can lead to shell rot, skin infections, and digestive issues. You don’t need an expensive filtration system to keep water clean if you stick to a routine:
- Partial water changes: Swap out 25–50% of the water weekly. It’s easy, effective, and cheap.
- DIY filtration: Place a sponge or foam in a small pump to trap debris. Some hobbyists even use a repurposed fish filter from a smaller aquarium.
- Spot cleaning: Remove leftover food, feces, and debris daily with a small net or scoop.
For the land area, remove any spoiled substrate or decaying plant matter. A quick rinse of rocks or platforms keeps everything hygienic. Even a shallow basin with mild, unscented soap can clean artificial decorations—just rinse thoroughly before returning them to the terrarium.
Affordable Nutrition and Supplements
Turtles need a balanced diet to thrive, but feeding them doesn’t require premium, high-cost pellets exclusively. Mix store-bought turtle pellets with fresh, affordable foods:
- Leafy greens: Romaine, dandelion greens, and kale (in moderation).
- Vegetables: Carrots, zucchini, or squash sliced thinly.
- Protein sources: Occasional feeder fish, cooked eggs, or shrimp for aquatic turtles like red-eared sliders.
Calcium supplementation is important, especially for species prone to shell deformities. You can sprinkle crushed cuttlebone or eggshells over food a few times a week—both are inexpensive and effective.
Monitoring Water Quality Without Expensive Equipment
You don’t need high-end meters to keep water safe. Simple observation and small tools go a long way:
- Visual checks: Cloudy water or unusual odors are a sign it’s time for a partial change.
- Temperature control: A basic aquarium thermometer ensures water stays within species-appropriate ranges.
- pH checks: Strips are cheap and let you spot major swings that could harm your turtle.
Homemade filtration hacks
- Sponge filters attached to a small pump
- Gravel or river rock layers to trap debris
- DIY overflow drain systems using old containers
Cost-effective feeding tips
- Rotate pellets with fresh greens and vegetables
- Use local, seasonal produce for variety and savings
- Supplement calcium with crushed eggshells or cuttlebone
- Avoid overfeeding to reduce water fouling
The secret to budget-friendly maintenance is consistency. Daily, small efforts prevent the need for expensive interventions later. You don’t need every gadget on the market—just a clean environment, balanced diet, and careful observation. Your turtle will thrive in a well-maintained setup, and you’ll save money while still providing excellent care.
Wrapping It Up – Thriving Turtles Without Breaking the Bank
Building a custom turtle terrarium on a budget isn’t just possible—it can be fun, creative, and deeply rewarding. From planning the right size and shape to crafting land and water areas, adding enrichment, and maintaining health, every step shows that thoughtful design outweighs flashy, expensive equipment.
The beauty of a budget-friendly setup is that it encourages creativity. You start seeing ordinary household items as potential basking platforms, PVC pipes as tunnels, and leftover containers as water sections. Even a simple arrangement of rocks, a small ramp, and a patch of sand or soil can turn into a thriving habitat where your turtle feels safe, active, and engaged. Watching a red-eared slider explore a newly rearranged platform or a box turtle navigate a small DIY tunnel is proof that enrichment doesn’t need a high price tag—it just needs intention.
Remember, a healthy turtle terrarium is all about balance. Water quality, lighting, temperature, diet, and space come first. Decorations, climbing structures, and toys are secondary—but they transform the tank from a basic enclosure into a stimulating environment. When these elements are combined thoughtfully, you create a home where your turtle can swim, bask, hide, dig, and explore just like it would in the wild.
Cost-conscious planning also has long-term benefits. A well-organized, easy-to-clean tank reduces the risk of disease and shell problems. Affordable DIY solutions can often be replaced or updated without guilt. Your wallet stays intact, your turtle thrives, and you get the satisfaction of knowing you built it all with your own hands.
So, whether you’re working with a small 20-gallon tank for a musk turtle or a larger 40-gallon setup for a red-eared slider, the principles stay the same: plan carefully, use safe and inexpensive materials, provide stimulation, and maintain consistently. Even on a shoestring budget, a turtle terrarium can be functional, beautiful, and truly enjoyable—for both you and your turtle.
At the end of the day, building a custom turtle terrarium is about connection. It’s about observing behavior, encouraging natural instincts, and creating a space that reflects your turtle’s personality. With a bit of creativity and planning, you can make a home that’s safe, engaging, and budget-friendly. And honestly, seeing your turtle thrive in a habitat you built? That’s priceless.
Best Seller Products On Amazon*